Continue to Site

Welcome to MCAD Central

Join our MCAD Central community forums, the largest resource for MCAD (Mechanical Computer-Aided Design) professionals, including files, forums, jobs, articles, calendar, and more.

How to model revolved cut in Pro/E?

tjallen29

New member
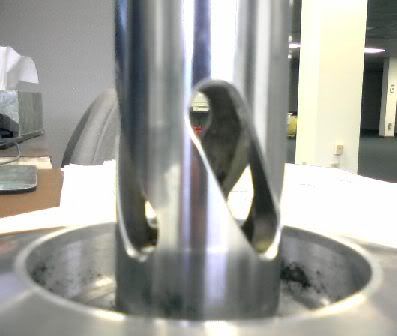
Below is an example of a revolved cut that was modeled in Inventor. It was done by creating a sketch and embossing it onto the part. I need to be able to do this in Pro/E (WF2.0) but so far I'm unsuccessful. Can anyone tell me how I would achieve this in Pro/E? Thanks a ton!


Revolvedcut.jpg
 
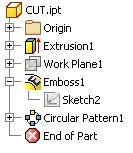
The model in the picture does not look like having a revolved cut feature. The slots on the periphery are anything but revolved cuts. Can you post a snapshot of the model tree of the Iventor file?
 
No, it's not revolved actually, it's just a sketch that's been extruded thru the part.


RevolvedCut-Tree.jpg

I can't have a straight-cut through a round part, I need to model it as if the cutter were actually following the curvature of the part, so that the cut remains "perpendicular" throughout. Below is another application where I need to model a similar type of feature.


cut2.jpg


Thanks again for the help...
 
I threw something together in WF2, see attached. Is
this what you're looking for?

--
hmm, having trouble with the upload, hopefully it will work...here is a picture of the model tree and the
part


--
okay, got it fixed, sorry about that
smiley9.gif
(can use Pro/E but can't upload a file...)

2009-04-08_135155_cylinder.prt.zip
Edited by: rklatte
 
HELP!


Hey thanks for the model. I was able to open it and generate the first 2 steps.


1. Sketch 1


2. Project 1


But when i try to do the Variable sections sweep, and i can get it to complete?


Here is the reference model


reference.jpg


And here is mine, i can not get that 3rd directional arrow, for which i assume is for material removal?


mine.jpg
 
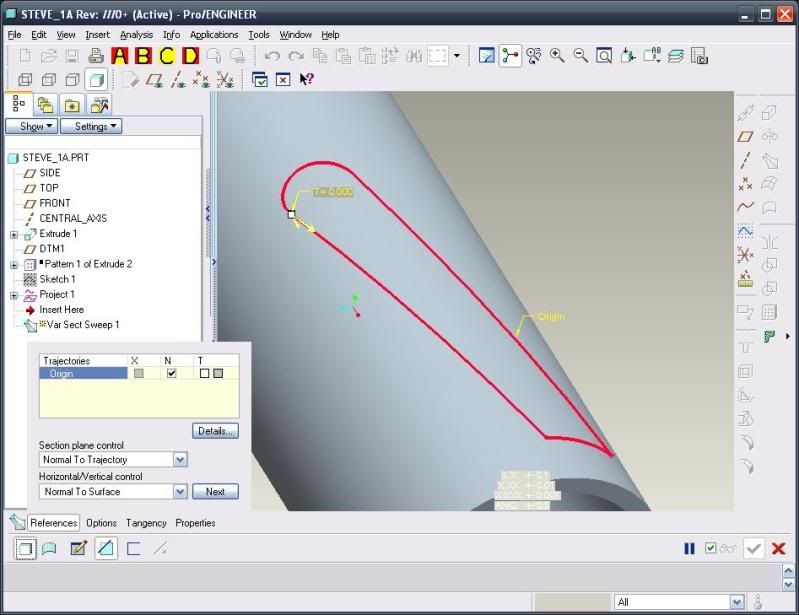
I am also having a problem getting the third axis to show when defining the Var. Section Sweep. I also for some reason am being prompted for a 'T' (trajectory?) value in the model view which is absent from the other examples shown. I believe I have all of the settings the same as in rklatte's model, but I guess I'm still missing something...


Var_Sec_Swp.jpg
 
Hey guys, sorry you are having so much trouble with the
file. The VSS section is only a straight line that has
it's length equal to the wall thickness. I was a little
surprised that I could get away with a single line for a
Solid VSS (I was lazy so I didn't want to figure out
what the proper width of a closed sketch section would
be
smiley1.gif
). But it does work IF the VSS is
constant section and that length is equal to the
wall thickness.

If you keep having trouble with it, you could
alternatively create the VSS as a surface but then you
will need to merge that into a surface copy of the ID
and the OD.
Edited by: rklatte
 
I guess I'm still a little confused as to how the VSS works in this case. I still think that I'm just not doing something right in the feature creation because if I take your model, delete the VSS and then go tomake a VSSagain I cannot recreate it. I end up with the same results as shown in my previous post even when working with your model. Ideas? Does the orderin whichthings are selected or set matter?


Thanks again for all of the help.
Edited by: tjallen29
 
Hmm, that is weird. I've tried recreating it here with no problems.

Take a look at the attached - I'm doing the same thing with surface merges. More features but
they don't take long to create. Also, I changed the VSS to use a projected curve on the OD and
ID - I think this is a more realistic cut than in the first model.


2009-04-09_131655_cylinder2.zip
 
Projecting the curve as shown will cause a cut to be made in the cylinder surface that does not maintain a constant width. You can check this by extending the length of the sketch or increasing the angle. You will then notice the distortion visually. I opened the model and cut the cylinder so that I could get a measurement across the cut to confirm my thoughts. I have done these with VSS surfaceswhere the cut went 360 degrees around the cylinder. Ithink that Megaladon also has suggested a method that shouldmay work. On my previous ones I had to add the end radius later as seperate surfaces.


Bob
 
Here's a way to make one that is parametrically controlled. The length and amount
of angle/twist of the slot are parameters. In my example the DTM1 and DTM2
distance are controlled by a parameter LENGTH_TWIST. Start a VSS.
The path of the VSS is simple line sketch whose ends are constrained to the DTM1
and DTM2.


The amount of angle/twist, ANGLE_TWIST parameter, is controlled by a trajpar
relation. So this one twist a total of 60 deg along the 2 inches path,
LENGTH_TWIST.


Next create 2 point at the midpoint of the edges created from the VSS.


Then create a curve through points. A simple straight line is all that is needed.
This will be the Origin path for the next VSS. The edges of the first VSS are used
also as Chain 1 & 2,.


Create your slot profile. I also controlled the slot width with a parameter SLOT_WIDTH.


Make sure the VSS is a cut and you are done.


All parametrically controlled too =) Here are some higher quality screenshots.

Cheers!


2009-04-09_210303_revolved_cut.zip
 
The slot width would be constant only if you see the slot in the radial direction at a particular height. Hence, from just one view point you can gauge the entire length of the slot. Coversely, if the width of the slot on a cylinder appears constant through out its length viewing from a single, then in reality the width would be varying.
 
I had started to create another model after I saw kdem's uploaded part using a graph to create the rectangular and cylindrical
portions of the cut in one shot (but in 2 halves). Later on though, I noticed that both in my new model and in kdem's model, if you
put an extruded cut of the theoretical end-mill diameter normal to the cylinder surface at a given point along the curve, you end up
with some edges. See below.


(I don't know if this would also affect James model just from looking at the pictures.)

Not it's not all that much of a difference but it still bothered me a bit, so I tried to figure out how in the world to model this.
I ended up looking at this post. The part that Jeff
posted at the bottom of page 1 was similar to what tjallen is trying to accomplish, so I borrowed the approach of offsetting a
center VSS surface on both sides, using a VSS to generate the end surfaces and then intersecting/trimming/merging to complete the
part. This results in a model that will allow the theoretical end-mill to pass through the slot without interference.


FWIW I also tried to create the cut with a helical sweep but actually didn't create the cut correctly. It might be possible to
create the cut using a helical sweep by playing around with the cross-section but I didn't.

Attached is the final part in WF2 format. Hope it's useful (and correct this time
smiley9.gif
)


2009-04-10_150313_cylinder-vss-offset.zip
 

Sponsor

Articles From 3DCAD World

Back
Top